Use this guide to creating sew a ruffle to include striking flourishes and gathers into your crafts. Learn how to make ruffles by reading on!
Sew a Ruffle: Ruffles have long been a mainstay of the fashion industry, giving simple clothes a touch of drama and luxury. Although they were originally intended for all sexes, they riffle are now frequently seen as a feminine flourish.
When soldiers would dress in numerous layers and cut the ends of their verbup cockle set sleeves to reveal the fabric underneath, the ruffle fashion first gained traction in Europe in the 15th century. So, Clothes were made with threads woven into them so the wearer could tighten ruffles as desired to imitate this look.
Sew a Ruffles are more common on dresses, skirts, and even cushions these days. It’s a talent you can frequently see the competitors on the Great British Sewing Bee using. We’ll walk you through the process of making ruffles in this tutorial because it’s a particularly useful sewing skill. Any garment looks better with ruffles, which are also an easy way to add more texture and drama. With these expert tips, you can make riffle tidy, voluminous ruffles every time. Check out: Mrsewguru
This guide was created for Simply Sewing Magazine, a best-selling periodical in the United Kingdom that features tasks for both experienced and novice sewers.
If you’re new to sewing, you can get some helpful hints by reading our guides on the best sewing machines for beginners, sewing for beginners, and how to use a sewing machine. Explore our selection of the best sewing kits for beginners if you can’t wait to start sewing.
How to Sew a Ruffle
Step 1:
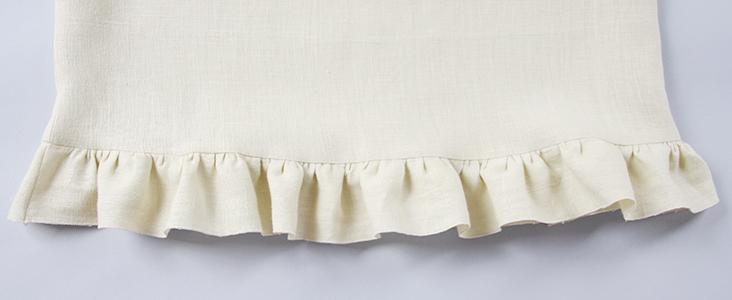
Choose the type of ruffle you wish to sew first. There are two primary forms of ruffles: straight and circular.
Straight ruffles are pretty and add style. To make them, you gather long strips of fabric and sew them in place. To make circular ruffles, you use a large cloth ring with a hole in the middle, which might look like a doughnut. Only the inner circle of the ring is attached to the garment. The rest of the fabric hangs and makes lovely ruffles.
Step 2
Next step of Sew a Ruffle, decide whether you need to create a double ruffle. If you decide on a straight ruffle, the next consideration is where you will gather the fabric: along one edge or in the middle? Smaller parts of lingerie, like the seat or the cuffs, are often decorated with little strips of double ruffles. This is because the end result is two different flounces that can be folded over for more volume.
Also Check: Kanye West Clothing
Step 3
Ruffles should always be measured twice. The additional fabric width that you’ll need to produce ruffles is one of the most crucial considerations. For instance, the strip you use to make the Sew a Ruffle will need to be much broader if you want to add a straight ruffle to the hem of a garment that has a 100cm diameter. As a general rule, cut the fabric for your ruffle to cover double the width you eventually want it to. Take into consideration that the cloth will become shorter the more tightly you gather it when calculating.
Step 4 of Sew a Ruffles
Before you start sewing your sew a ruffles, you should think about what kind of fabric you want to use. As with any dressmaking project, the fabric you use will have a big effect on how the finished item sits, moves, and is worn. The same is true when making ruffles. If your cloth is thick and stiff, your ruffles will stand out more. Sturdier fabrics like scuba and wool will give you more volume (and thus more bulk in the gathered seams) than lighter fabrics like viscose and satin.
Step 5
Before constructing the rest of your Sew a Ruffle , you must finish the exposed edge since, once it is collected and linked, it will be nearly impossible to finish. You can finish your ruffle’s edge in a number of different ways. Even though a standard double-folded hem is a fantastic, simple alternative, concealing the fabric edge with contrast bias tape provides an added touch of richness and gives the completed ruffle a little more volume and shape. For Making different thing you need a cobbler sewing machine for buying click here
Step 6
You must then work the gathers. Stitch two lines of straight, broad machine stitch down the width of your strip to form a ruffle. Sew a line down one long side to create a conventional ruffle or down the middle to make a double ruffle. Leave tails of about 15 cm at the beginning and end of the two lines, and space them about 5mm apart.
Once the cloth has been removed from the machine, gently pull at one side of it to gather it up evenly until the ruffle is the desired width. With the proper side towards the fabric, pin the ruffle into place on your outfit. To prevent the thread from unravelling while you stitch, wrap the thread tails around the first and last pins.
Step 7
By utilising a special gathering foot on your sewing machine, you may expedite the gathering process. This innovative tool allows you to create equal, evenly spaced ruffles by grabbing the fabric as you stitch. It can even be used to create and attach ruffles in one motion, thus reducing the amount of sewing required.
To speed up the process, practise on scraps of fabric.
Before attempting it on your finished product because it can take some time to get the method just right. Use a long stitch length and light thread tension to ease the strain on the drawn-up threads and to make it simpler to cut them out afterwards.
When working with machine gathers, a greater stitch length is nearly always preferable. The longest stitch setting on your machine should be 4 or 5 millimetres. Test a tiny area first. You should discover that ruffling the fabric is more simpler and causes less irritating thread breaks thanks to the longer length.
Step 8 of Sew a Ruffle
As your project progresses, it’s simple to lose track of which line of thread is which. When there are multiple ones to deal with. Use a bright thread colour that contrasts with the rest of your make to make it easy to identify your gather lines. So, When your project is finished.
You’ll be able to easily identify and remove them, leaving the last seams in tact.
Step 9
Unexpectedly, dental floss can be a useful tool for making ruffles because it is strong and visible, making it ideal for manipulating gathers.
Simply snip and place a length of floss along the region you wish to gather, and then couch over it with a wide machine zigzag stitch using a thread colour that is contracting.
After stitching, draw the cloth up by holding one end of the floss and pulling the other, then secure to show off your final ruffle.
Step 10
As we seamstresses are a picky bunch, it is essential that the ruffle is done as smoothly as possible. The positioning of the ruffle is equally as crucial as its design.
Because if done poorly, it may entirely ruin the appearance of the garment! Utilize notches to align the fabric’s edges using notches.
The notches will not be seen from the right side as they will be concealed within the seam allowance. Alternately, begin by pinning the fabric to the garment’s edge on either side of the ruffle’s centre point. Move outwards until the seam is perfectly aligned. Despite the temptation, “by sight” placement of the ruffle may require hours of unpicking.
You’ve completed! You’ve learned how to sew ruffles; put it to use by modernising an outdated skirt or adorning a dress.